After owning a Cricut machine, anyone gets a chance to unlock creativity and start a new business. Apart from that, they also push their limits and spread wings to make headway to be the best in the crafting world. It’s plain to see that Cricut Inc. is aware of developing various craft plotters, heat presses, and many more. Among those versions, the Cricut Maker is the best first-class cutting machine for professionals.
Also, this cut-die machine model cuts more than 300+ covers from most soft paper to the tough stuff. Besides, this version is available in different colors and at a pocket-friendly price. Plus, Cricut Maker works together with Design Space,allowing them to create designs on its canvas. Don’t have any idea about how to use Cricut Maker? In this blog, we’ve given our best to make you learn about this model setup & create projects with this machine.
How to Set Up Cricut Maker on PCs?
Before beginning the crafting process, every crafter needs to set up their craft plotter with their separate PCs (Windows/Mac). To successfully finish the process, you need to follow the steps given below:
- First, unbox your cutting machine and switch it on.
- After that, connect your machine to your PC via a USB cable or pair it up wirelessly.
- Following this, pay a visit to the Design Space setup page and download the app.
- Now, go after the instructions for creating or signing up for the Cricut app.
- Further, after the app installation, start setting up your machine very carefully.
- At last, you will be informed to do test cutting after the setup comes to an end.
- After finishing up the Cricut Maker setup method, proceed by how to use Cricut Maker after pairing it up via Bluetooth method.
How to Pair Cricut Maker to a Desktop Wirelessly?
Equally important, it’s time to discuss Cricut Maker pairing up with Desktop using Bluetooth facility. Go through the following steps to finish the wireless process without any trouble:
For Windows
- Start the process by ensuring that your cutting machine is on and within 10-15 ft of your device.
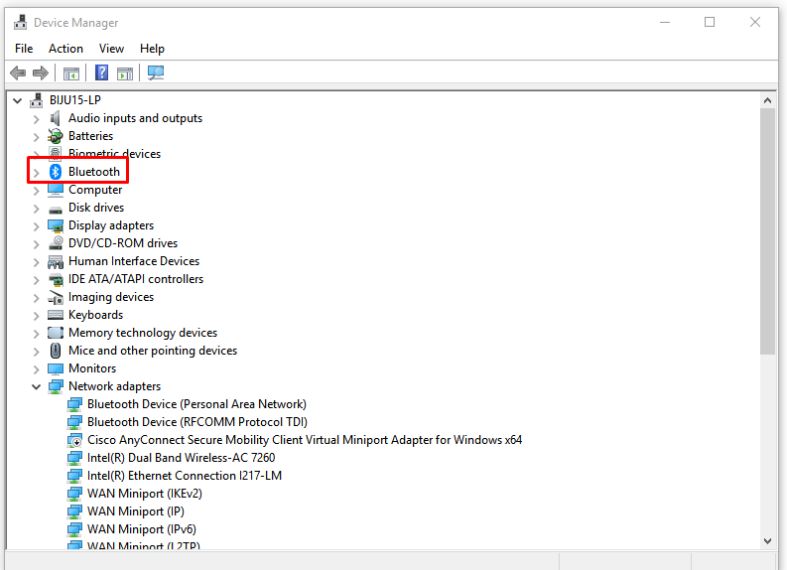
- To check whether your model comes with Bluetooth, go to the Device Manager folder.
- If you see Bluetooth in the list, it clearly means that your system Bluetooth is on.
- Afterward, close the folder and open the Settings page.
- Further, press the Devices > Add Bluetooth or other device option.
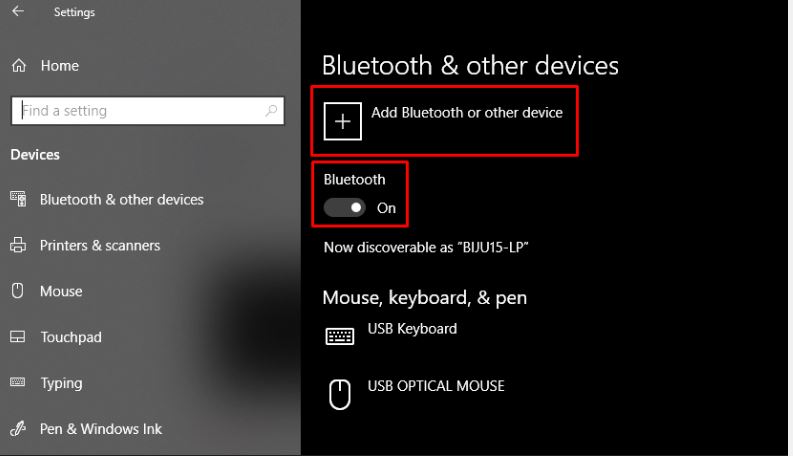
- Following this, press Bluetooth and hold on till your system is searching for the Cricut machine.
- Next, choose your machine model and fill in the blank with the PIN (0000).
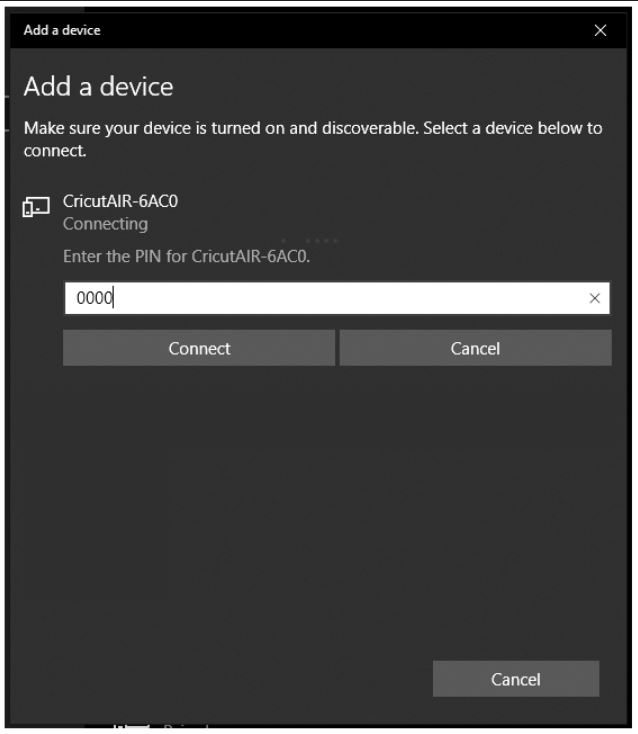
- At this time, tick the Connect button appearing on the left side of the box.
- Finally, your Maker machine & Windows operating system pair-up process will come to an end.
In the coming part of the blog, you will get to learn about wirelessly pairing up the Mac with this model.
For Mac
- Begin this method by checking that the Maker cutting machine is on and within 10-15 ft of your Mac.
- Next, to check whether your OS is on, go to Apple menu > System Preferences window.
- Now, tick the Bluetooth option and turn it on to proceed toward the next step.
- Next, tap the Pair box, enter the PIN, and again tick the Pair option.
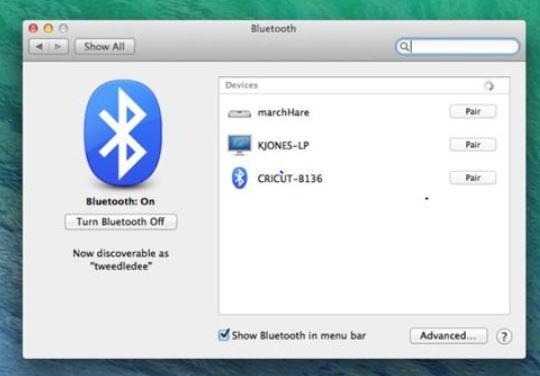
- Finishing off, you will get the pop-up message with both of your devices with a successful pair-up process.
Following finishing up the setup & pairing up process, the DIYer will be capable enough to craft out the custom project by operating this Cricut machine.
How to Use Cricut Maker?
After finishing the setup & pairing process in the blog’s prior sections, one can craft engraved acrylic ornaments out of their Cricut Maker. To create this custom project, one needs to follow the following:
- First, open Cricut Design Space and open the My Project folder.
- Second, choose the engraving pattern from the list as per your preference and press the Customize button.
- Third, resize the pattern and insert any shape from the Shapes toolbar.
- Next, change the size of the shape and change the basic cut into peel given under the Operations dropbox.
- Following this, tick the Upload option and choose the file from the Upload Image folder.
- After selecting the image, minimize the image size as per your preference.
- Now, choose Engrave given under the Operations dropbox visible on the left side of the screen.
- Further, change the size of the file, drag it into engrave fill, and select both the fill and file together.
- Following this, press the Click option appearing on the bottom right of the canvas.
- Also, delete the duplicate image and then insert it inside the shape.
- After doing that, press the Make It button and select Engrave > Mirror option.
- Plus, tap the Continue option, connect your Maker model, and set the base material.
- After doing step no. 12, remove the plastic piece from the acrylic blank and place it on the mat.
- Now, save the blank by covering it with transfer tape and load the cutting mat into the cut-die machine.
- Following this, press the Start button and hold on till the cutting & printing process is going on.
- After, please take out the cardstock, place the design on it, and set down the design on the blank with the lint roller.
- Viola, your engraved acrylic ornaments are all set to be tied on the Christmas tree or the wall.
In brief, the above-said steps must’ve taught you how to use Cricut Maker to create Engraved Acrylic ornaments. Apart from that, we wish you all the best about utilizing this craft-plotter model.
Question: What Can I Do With Cricut Maker?
Answer: Once you become an expert in accessing Maker cutting machines, it will get much easier for DIYers to design custom projects. They can add a personal touch to the project, which they can give to their friends/family on special occasions. Go through the list below:
- Holographic Iron-On Tote Bag
- Terra Cotta Pots
- Iron On Baby Clothes.
- Craft Foam Bookmarks
- Water Bottles
- Leather Keychains
Question: How Can I Setup Cricut Maker on My Smartphone?
Answer: Smartphone users can also set up the Maker model with the following steps:
- First, you are supposed to plug in the machine and power it on.
- Next, pair up your smartphone with a Cricut machine via Bluetooth.
- Now, install the Design Space app for your mobile devices.
- After launching the app, sign in or create a Cricut ID.
- Go to the Menu section and select Machine Setup.
- Following this, go through the visible steps to finish the setup process.
- You will know that the setup is complete when you call for a test cut.
Question: What Supplies Are Provided With Cricut Maker?
Answer: Along with this smart cut-die model, the DIYer will also get some of the chief supplies. They will help them in finishing up the project as per their choice. Have a look at the supplies below:
- Maker cutting machine
- Design Space account
- Rotary Blade + Drive Housing
- Premium Fine-Point Blade + Housing
- Fine Point Pen, Black
- Compatible Cutting mat
- Welcome Book
- USB cable & power adapter
- Cricut Access 50-day free trial for new members
- 50 free ready-to-make projects with 25 sewing patterns
- Materials for a practice project
